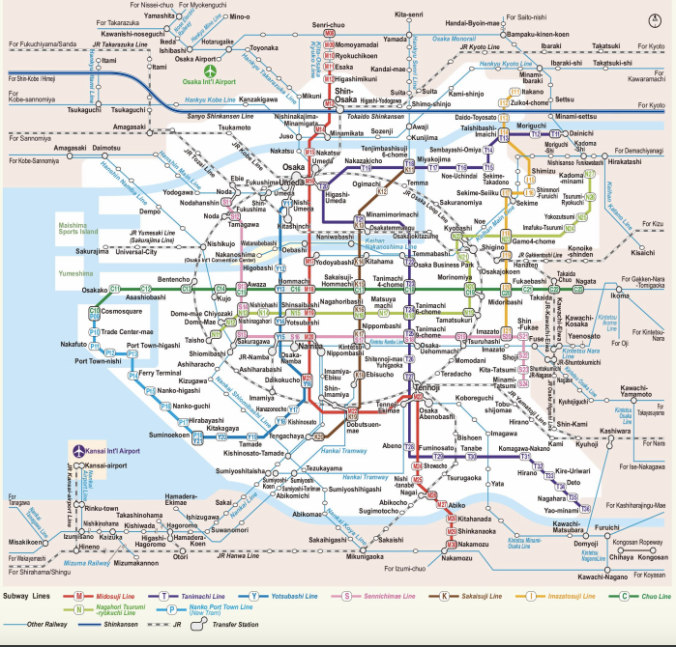
USJ is a very popular theme park no matter what period of the year it is, so here are couple of tips that we thought you should know before you head over there. First off, we highly recommend that you avoid going on a weekend. Secondly, when you arrive at KIX airport, go to the Visitor Information Center and buy your tickets there. The price is the same as it is at the USJ Gate and you’ll save time. The tickets are valid for 1 year. I only got the regular pass so I don’t know if they sell the Express Pass there as well.

Universal Studios Japan Ticket
However, we found that it was possible to go through most of the rides (the popular and thrilling ones, at least) without having to buy the Express Pass. It’s also important to find out when USJ opens because their opening times vary throughout the week. Definitely try to be there an hour before the opening time and have an idea of which rides you want to go on to maximize your efficiency (description below).

Universal Studios Japan Entrance
Make sure you have enough energy! Have a full breakfast at the Universal City Walk and then start lining up at the entrance. Usually, they open the park earlier than the listed time. In our case, we had breakfast at Mos Burger and we loved it. I’ll be writing up a separate post on that.

Hogwarts Castle – Harry Potter World
Once inside, go to the most popular rides. We headed straight for Harry Potter World since it’s the newest and busiest area. Our first ride was Harry Potter and the Forbidden Journey. Normally, you need timed entry passes to get in but we were early enough that we didn’t have to do this and we didn’t have to wait very long (~30 minutes), considering this ride can get up to 3-hour wait times.

Butterbeer prices

Left: Frozen; Right: Regular Butterbeer
If you want to try Butterbeer (non-alcoholic!), I suggest getting the frozen one. The regular costs ¥600 and the frozen one is ¥750 but it’s way better. When I went to Universal Studios Orlando, I remember the butterbeer tasted more like a root beer float. The one here tasted like cream soda.
This slideshow requires JavaScript.
Popular Rides & Attractions
- Harry Potter and the Forbidden Journey – Pretty fun and surprisingly thrilling even though it’s not a typical rollercoaster ride. You get to wear these funky 3D glasses too. All narration in Japanese though…
- Flight of the Hippogriff – Also in HP world, not bad. It was like a miniature roller coaster ride.
- Jurassic Park – Prepare to get wet (especially if you’re in the back!). Not too bad though; we dried off pretty quickly since it was scorching hot out.
- The Flying Dinosaur – One of my favourites. A must try! New addition to USJ since 2015. It looks extremely scary since your legs are basically dangling in the air but it was fun. Super fast thrilling coaster with lots of loops! Only thing is we lined up for over 2 hours… single rider line-up may be a lot faster.
- The Amazing Adventures of Spiderman – Another 3D ride, similar to Harry Potter. Was again more thrilling than expected.
- Space Fantasy – Another one of my favs. Lots of spinning and several drops in the dark.
- Dragon Ball Z 4D – This was their seasonal attraction. It was held in the theatre so it was able to seat a lot of people at at time. Pretty interactive experience since you get to feel air and water spraying at you and the chairs shaking. Action-packed. Even though it was all in Japanese, it was still really fun!
- Hollywood Dream Ride – AMAZING rollercoaster. Seriously, you need to go on this. Drops and turns were so smooth and it was the best and most thrilling ride I’ve ever been on. They have 2 versions of this ride. One is regular and the other is called “Backdrop” so it actually goes in reverse! I wanted to do the backdrop version but wasn’t able to choose which side to go on. Loved that you could choose a soundtrack to play while you’re riding on it too. Gave me an awesome rush. I felt like I was floating after this ride. (Note: I went on the single-rider line since no one wanted to ride with me and I was able to bypass the huge line-up in just 5 minutes!)
General Tips/Notes:
Go for the single rider line if you can, to save time.
The rides are all in Japanese so unless you fluently understand Japanese, it takes a little bit away from the whole experience. I wish they had English subtitles.
I find it helpful to bring a water bottle. They have several drinking stations and you can fill your bottle instead of paying for a drink. Also pack light. You don’t want to be lugging around a bunch of stuff since you’ll have to stow it away in lockers before you go on the rides.
Line up etiquette: Line ups can be as long as 90 minutes or more for some of the more popular rides so please leave some room and don’t crowd the people in front of you. It’s hot as it is already and you crowding the people in front of you won’t make the line move any faster. (This is Japan –no one will jump in front of you and take your spot!)

Universal City Walk at night

Takoyaki Museum
After you’ve gone on all the rides, you can head to Universal City Walk which is just outside. They have a bunch of Takoyaki restaurants inside the Takoyaki Museum. You can order an assorted plate from each restaurant. Yum!